네이버 개발자 사이트를 접속해서 로그인을 해주세요!
https://developers.naver.com/main/
NAVER Developers
네이버 오픈 API들을 활용해 개발자들이 다양한 애플리케이션을 개발할 수 있도록 API 가이드와 SDK를 제공합니다. 제공중인 오픈 API에는 네이버 로그인, 검색, 단축URL, 캡차를 비롯 기계번역, 음
developers.naver.com

애플리케이션 등록을 눌러주세요

앱 이름과 사용 할 API에서 네이버 로그인을 골라주세요.

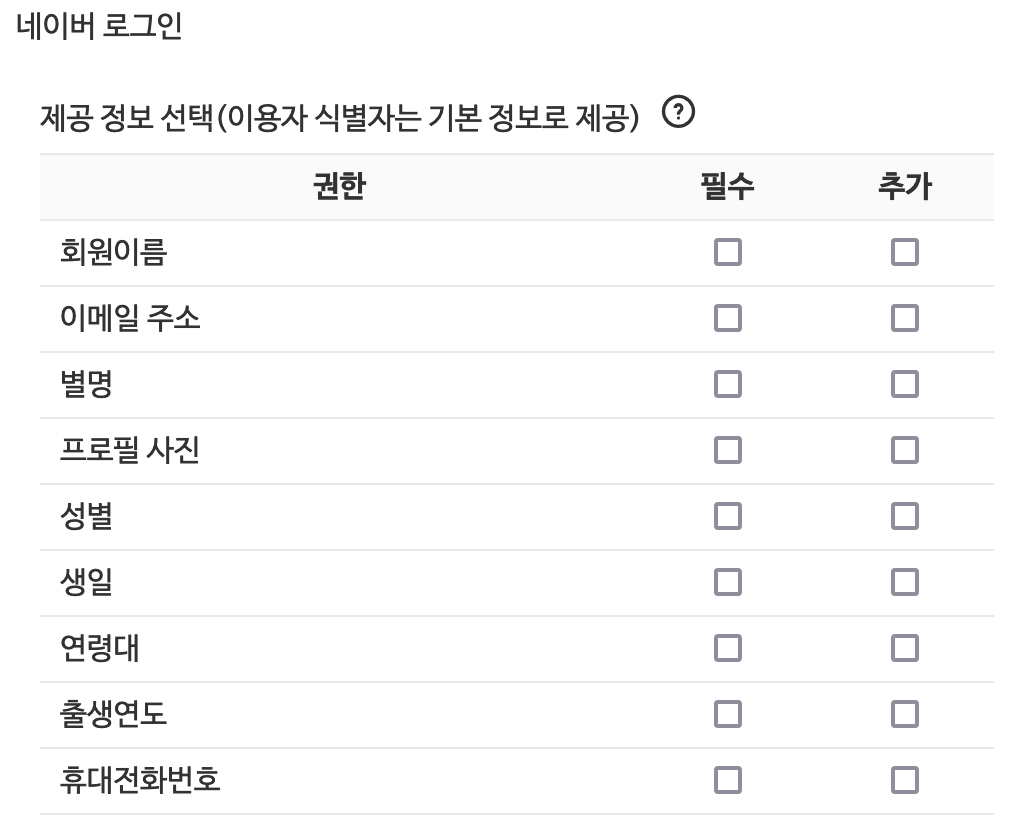
필수로 얻어야 할 항목과 그렇지 않은 항목을 체크해주세요!

환경추가에서 iOS를 눌러주세요.

다운로드 URL과 URL Scheme를 입력해주세요.
다운로드 URL이 없는 경우 저는 그냥 아무 url 적었습니다..ㅋ 아직 개발단계라 배포가 안되어있어서요.
스킴 같은경우는

프로젝트 info 설정에 가시면

아래보시면 URL Types라고 있습니다!

추가 하시면 이렇게 identifier적어주시고 결정적으로 오른족에 URL Schemes라고 있습니다 이걸 셋팅하시고 적어주시면 됩니다!
검수를 받기전에 테스트용으로 쓸 수 있는 아이디를 등록 할 수 있습니다.
https://onedaycodeing.tistory.com/167
Android Kotiln(코틀린) 네이버 아이디 로그인하기 ( 안드로이드 12 이슈 대응 포함)
기본 개발자사이트에서 등록하는 과정은 https://onedaycodeing.tistory.com/121 안드로이드 네이버 로그인 예제 developers.naver.com/main/ NAVER Developers 네이버 오픈 API들을 활용해 개발자들이 다양한 애..
onedaycodeing.tistory.com
이 게시물의 처음내용만 보고 참고하시면 좋을것같습니다.
자 이제 본격적으로 해보도록 하겠습니다.
pod 'naveridlogin-sdk-ios'포드 먼저 설치해주시구용 (pod install)
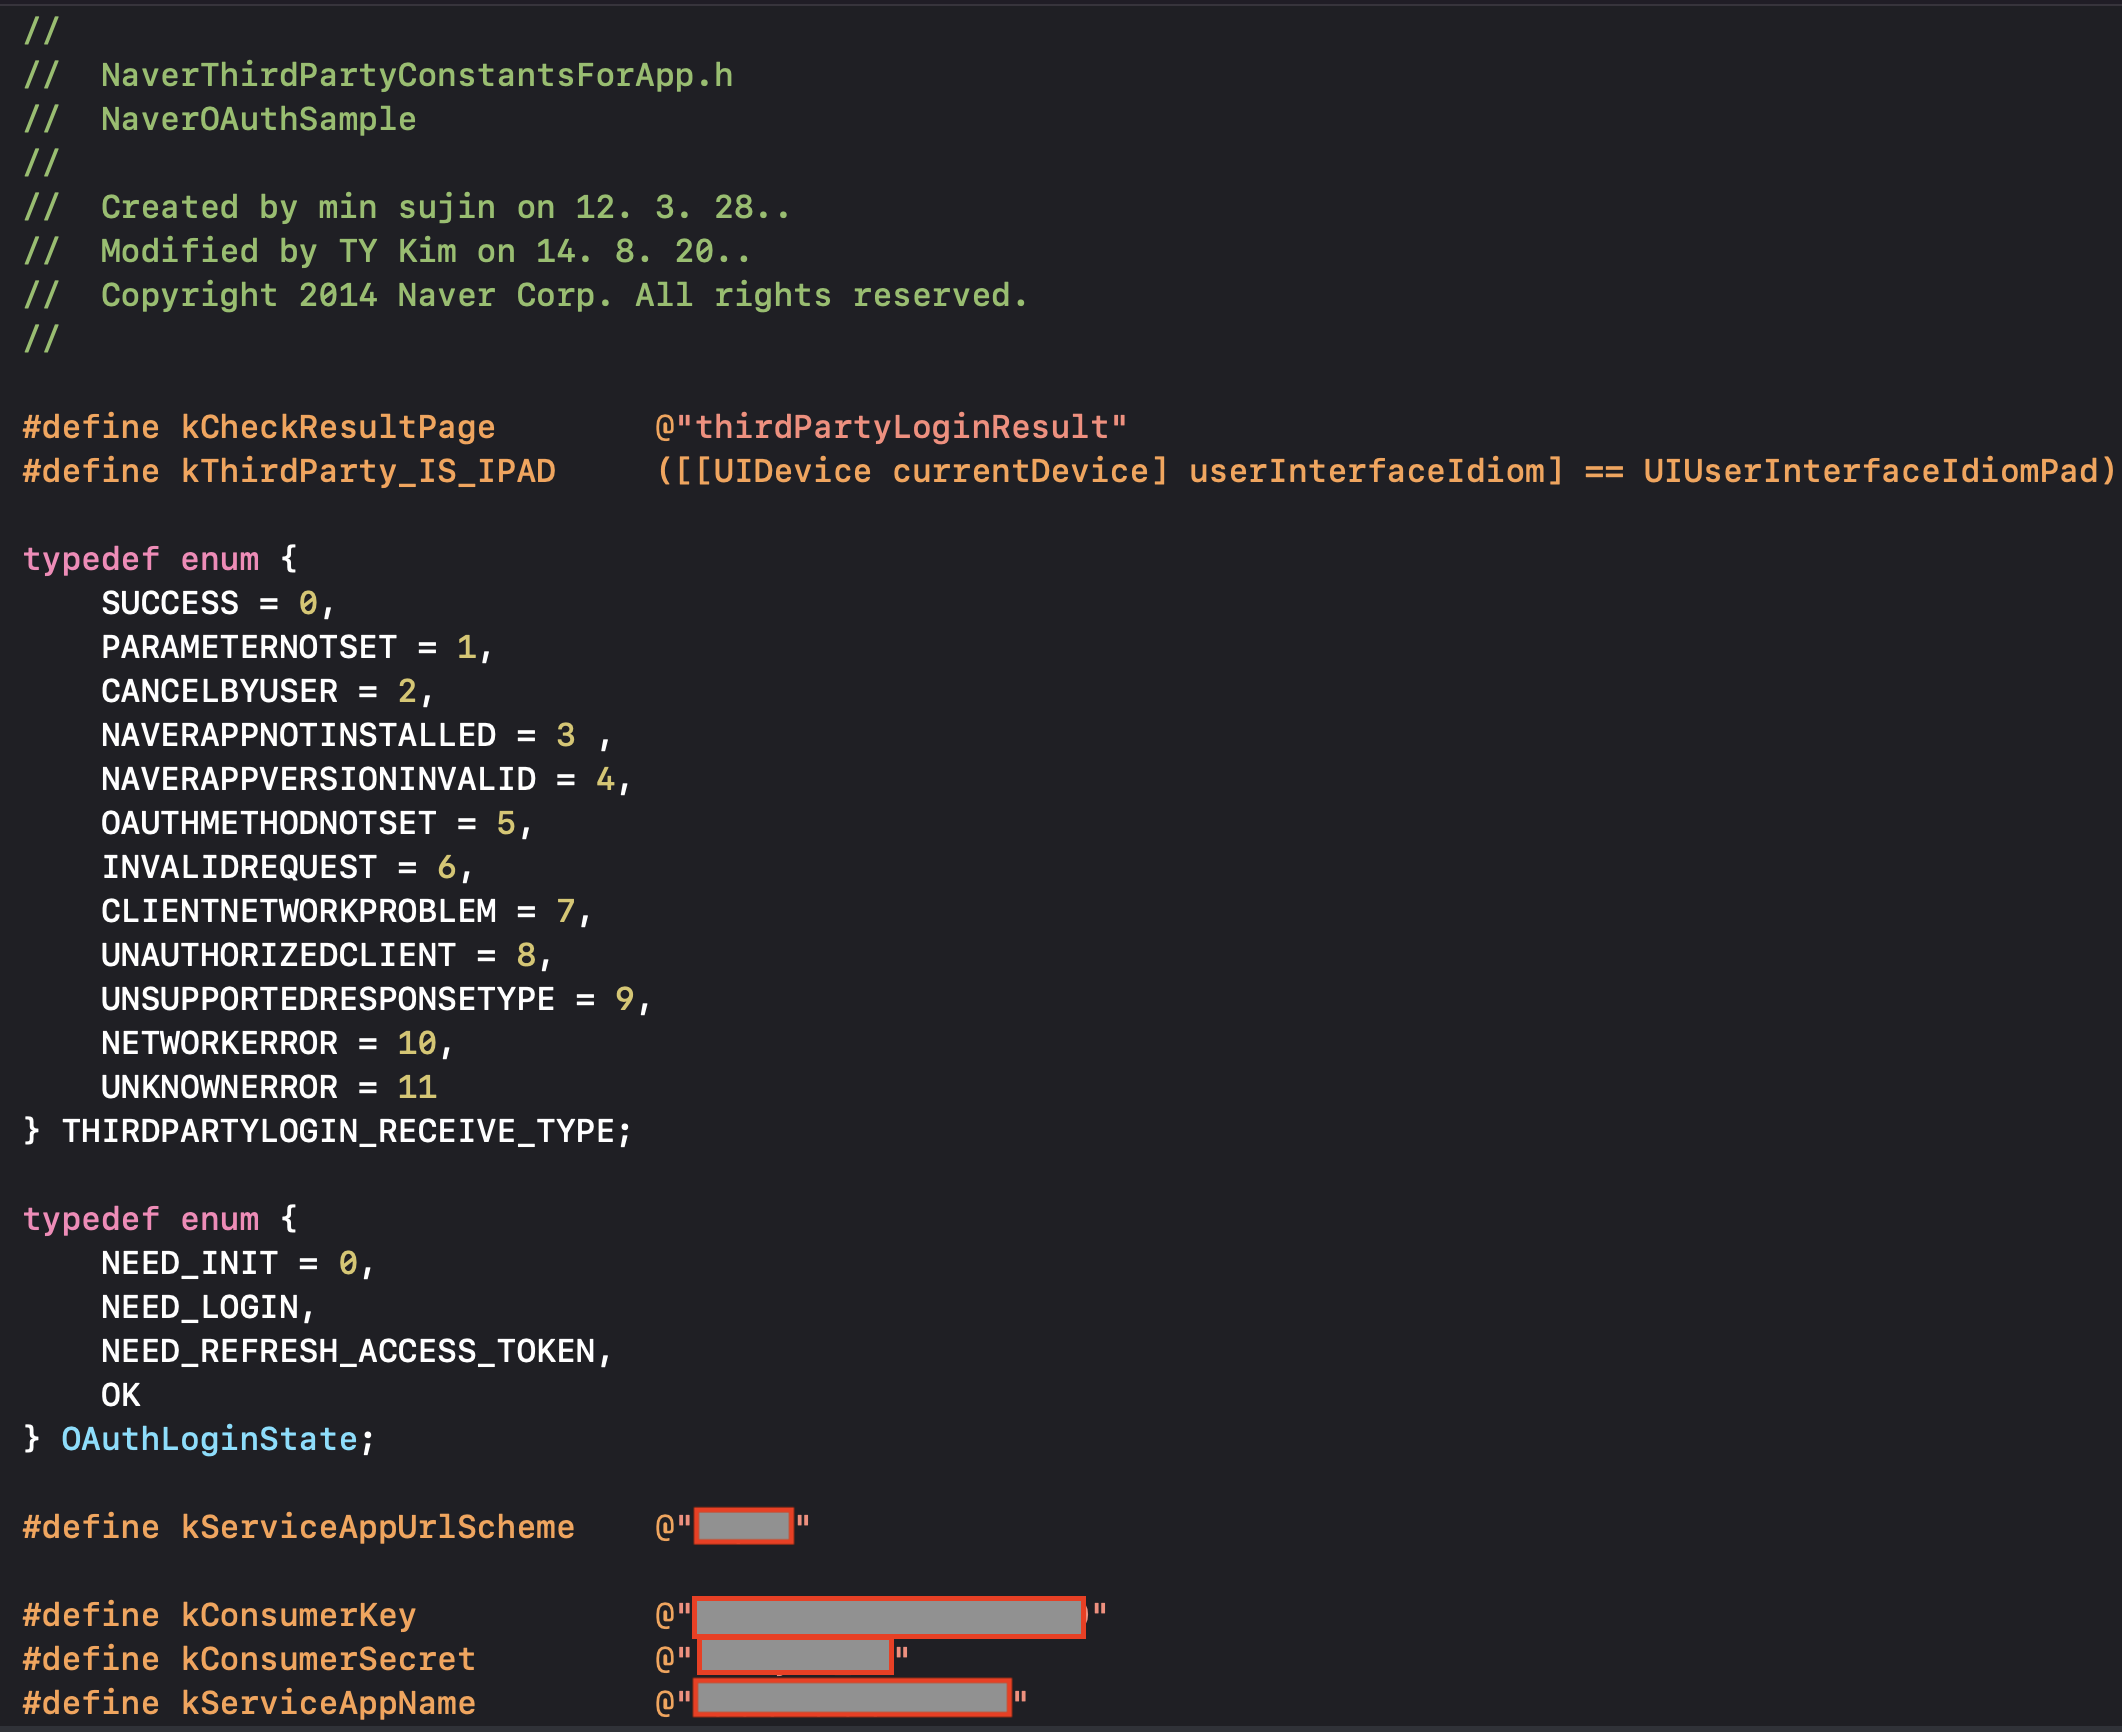
프로젝트 폴더 - Pods - naverilogin-sdk-ios - NaverThirdPartyLogin.framework - Headers - NaverThirdPartyConstantsForApp.h 들어가주세요.

밑에 #define(전처리기)를 값을 변경해주세요.
kServiceAppUrlScheme (저희가 작성한 스킴)
kConsumerKey (네이버 개발자 사이트에있는 Client ID)
kConsumerSecret (네이버 개발자 사이트에있는 Client Secret)
kServiceAppName (앱 이름)
자 이제 AppDelegate 로 넘어오겠습니다 (저는 스크린 안씁니다..ㅎ)
func application(_ application: UIApplication, didFinishLaunchingWithOptions launchOptions: [UIApplication.LaunchOptionsKey: Any]?) -> Bool {
        application.registerForRemoteNotifications()
        let instance = NaverThirdPartyLoginConnection.getSharedInstance()
        instance?.isNaverAppOauthEnable = true //네이버앱 로그인 설정
        instance?.isInAppOauthEnable = true //사파리 로그인 설정

        instance?.serviceUrlScheme = "" //URL Scheme
        instance?.consumerKey = "" //클라이언트 아이디
        instance?.consumerSecret = "" //시크릿 아이디
        instance?.appName = "" //앱이름

        return true
 }
func application(_ app: UIApplication, open url: URL, options: [UIApplication.OpenURLOptionsKey : Any] = [:]) -> Bool {
NaverThirdPartyLoginConnection.getSharedInstance()?.application(app, open: url, options: options)
return true
}주석 보시면 아시겠죠?!!
이제 뷰컨으로 넘어오겠습니당
import NaverThirdPartyLogin
import Alamofire

let naverLoginInstance = NaverThirdPartyLoginConnection.getSharedInstance()

    override func viewDidLoad() {
        super.viewDidLoad()

        naverLoginInstance?.delegate = self
    }
델리게이트 대리자도 설정해주시고 인스턴스도 받아주시고 주저리주저리 해줍니다.
그리고 네이버 로그인할 버튼 이벤트에
naverLoginInstance?.requestThirdPartyLogin()이렇게 걸어주시면 됩니다!
로그아웃은
naverLoginInstance?.requestDeleteToken()요 코드를 작성해주면 됩니당
그리고 함수를 하나 만들어줍니다.
func naverLoginPaser() {
          guard let accessToken = naverLoginInstance?.isValidAccessTokenExpireTimeNow() else { return }

          if !accessToken {
            return
          }

          guard let tokenType = naverLoginInstance?.tokenType else { return }
          guard let accessToken = naverLoginInstance?.accessToken else { return }

          let requestUrl = "https://openapi.naver.com/v1/nid/me"
          let url = URL(string: requestUrl)!

          let authorization = "\(tokenType) \(accessToken)"

          let req = AF.request(url, method: .get, parameters: nil, encoding: JSONEncoding.default, headers: ["Authorization": authorization])

          req.responseJSON { response in

            guard let body = response.value as? [String: Any] else { return }

              if let resultCode = body["message"] as? String{
                  if resultCode.trimmingCharacters(in: .whitespaces) == "success"{
                      let resultJson = body["response"] as! [String: Any]

                      let name = resultJson["name"] as? String ?? ""
                      let id = resultJson["id"] as? String ?? ""
                      let phone = resultJson["mobile"] as! String
                      let gender = resultJson["gender"] as? String ?? ""
                      let birthyear = resultJson["birthyear"] as? String ?? ""
                      let birthday = resultJson["birthday"] as? String ?? ""
                      let profile = resultJson["profile_image"] as? String ?? ""
                      let email = resultJson["email"] as? String ?? ""
                      let nickName = resultJson["nickname"] as? String ?? ""

                      print("네이버 로그인 이름 ",name)
                      print("네이버 로그인 아이디 ",id)
                      print("네이버 로그인 핸드폰 ",phone)
                      print("네이버 로그인 성별 ",gender)
                      print("네이버 로그인 생년 ",birthyear)
                      print("네이버 로그인 생일 ",birthday)
                      print("네이버 로그인 프로필사진 ",profile)
                      print("네이버 로그인 이메일 ",email)
                      print("네이버 로그인 닉네임 ",nickName)
                  }
                  else{
                      //실패
                  }
              }
          }
    }
Alamofire를 통해 네이버쪽과 통신 해줍니다.
Alamofire가 없으신 분들은 추가해주세요. pod!!
pod 'Alamofire', '~> 5.1'
그리고 extension 해줍니다.
extension LoginController : NaverThirdPartyLoginConnectionDelegate{
    func oauth20ConnectionDidFinishRequestACTokenWithAuthCode() {
        print("네이버 로그인 성공")
        self.naverLoginPaser()
    }

    func oauth20ConnectionDidFinishRequestACTokenWithRefreshToken() {
        print("네이버 토큰\(naverLoginInstance?.accessToken)")
    }

    func oauth20ConnectionDidFinishDeleteToken() {
        print("네이버 로그아웃")
    }

    func oauth20Connection(_ oauthConnection: NaverThirdPartyLoginConnection!, didFailWithError error: Error!) {
        print("에러 = \(error.localizedDescription)")
    }
}
이러면 끝입니다!
ㄱ ㅏ ㄱ 푸시
ㅗ o ㅗ 푸시 :D
'IOS' 카테고리의 다른 글
| Swift 다크모드 무시하기 (0) | 2022.09.16 |
|---|---|
| 아이폰 UDID 확인 너무 간단한데요? (0) | 2022.02.18 |
| Swift 주기별로 함수 실행하기( 타이머 ) (0) | 2021.12.16 |
| Swift AppDelegate에서 ViewController 참조하기 (0) | 2021.12.08 |
| Swift rootView 변경하기. (0) | 2021.12.08 |

댓글