NAVER Developers
네이버 오픈 API들을 활용해 개발자들이 다양한 애플리케이션을 개발할 수 있도록 API 가이드와 SDK를 제공합니다. 제공중인 오픈 API에는 네이버 로그인, 검색, 단축URL, 캡차를 비롯 기계번역, 음
developers.naver.com
네이버 개발자사이트를 들어가주세요.

로그인 클릭

로그인 후 Documents - 네이버 아이디로 로그인을 들어가주세요.

오픈 API 이용 신청> 눌러주세요.

앱 이름과 필요한 권한들을 체크해주시면 됩니다.
저같은 경우는 회원이름, 이메일,별명, 프로필사진 을 필수권한으로 두고 나머지는 추가로 뒀습니다.

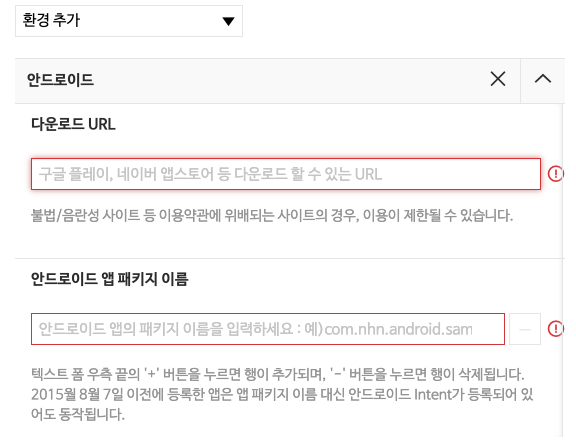
그리고 환경 추가를 눌러서 안드로이드를 선택해주세요.

다운로드 URL은 구글스토어의 URL을 적어주시면 됩니다.
패키지명은 메니페스트에서 확인 가능합니다.


아래 보이는 등록하기를 눌러주세요.
검수가 끝나면 네아로 사용이 가능합니다.


Client ID / Client Secret 는 잘 복사해서 보관해두세요.
이제 소스를 볼게요.
우선 종속성 먼저 추가하겠습니다.
build.gradle(:app)
implementation 'com.naver.nid:naveridlogin-android-sdk:4.2.6'
메니페스트에 권한을 추가하겠습니다.
<!-- 인터넷사용 -->
    <uses-permission android:name="android.permission.ACCESS_NETWORK_STATE" />
    <uses-permission android:name="android.permission.INTERNET" />
<!-- 인터넷사용 -->
XML코드 한번 볼게요
<?xml version="1.0" encoding="utf-8"?>
<androidx.constraintlayout.widget.ConstraintLayout
    xmlns:android="http://schemas.android.com/apk/res/android"
    xmlns:app="http://schemas.android.com/apk/res-auto"
    xmlns:tools="http://schemas.android.com/tools"
    android:layout_width="match_parent"
    android:layout_height="match_parent"
    tools:context=".MainActivity"
    android:orientation="vertical">

    <com.nhn.android.naverlogin.ui.view.OAuthLoginButton
        android:id="@+id/buttonOAuthLoginImg"
        android:layout_width="wrap_content"
        android:layout_height="50dp"
        app:layout_constraintBottom_toBottomOf="parent"
        app:layout_constraintEnd_toEndOf="parent"
        app:layout_constraintStart_toStartOf="parent"
        app:layout_constraintTop_toTopOf="parent">
    </com.nhn.android.naverlogin.ui.view.OAuthLoginButton>

    <Button
        android:id="@+id/logout"
        android:layout_width="wrap_content"
        android:layout_height="wrap_content"
        android:layout_marginTop="32dp"
        android:text="로그아웃"
        app:layout_constraintEnd_toEndOf="parent"
        app:layout_constraintStart_toStartOf="parent"
        app:layout_constraintTop_toBottomOf="@+id/buttonOAuthLoginImg">
    </Button>

</androidx.constraintlayout.widget.ConstraintLayout>
만약 버튼이 안보일 시 클린빌드 한번 해주세요.

private static String OAUTH_CLIENT_ID = "CLIENT_ID";
private static String OAUTH_CLIENT_SECRET = "CLIENT_SECRET";
private static String OAUTH_CLIENT_NAME = "앱이름";
private static OAuthLogin mOAuthLoginInstance;
OAuthLoginButton mOAuthLoginButton;
Button logout;
public static String accessToken = "";

        logout = findViewById(R.id.logout);

        mOAuthLoginInstance = OAuthLogin.getInstance();
        mOAuthLoginInstance.init(this,OAUTH_CLIENT_ID,OAUTH_CLIENT_SECRET,OAUTH_CLIENT_NAME);

        mOAuthLoginButton = (OAuthLoginButton) findViewById(R.id.buttonOAuthLoginImg);

        OAuthLoginHandler mOAuthLoginHandler = new OAuthLoginHandler() {
            @Override
            public void run(boolean success) {
                if (success) {
                    accessToken = mOAuthLoginInstance.getAccessToken(getApplicationContext());

                    new Thread(new Runnable() {
                        @Override
                        public void run() {
                            String header = "Bearer " +  accessToken;
                            Map<String, String> requestHeaders = new HashMap<>();
                            requestHeaders.put("Authorization", header);
                            String apiURL = "https://openapi.naver.com/v1/nid/me"; //엑세스 토큰으로 유저정보를 받아올 주소
                            String responseBody = get(apiURL,requestHeaders);
                            Log.d("responseBody 확인 ",responseBody); //주소로 얻은 유저정보 (제이슨)
                            NaverUserInfo(responseBody);
                        }
                    }).start();
                }
                else {
                    String errorCode = mOAuthLoginInstance.getLastErrorCode(getApplicationContext()).getCode();
                    String errorDesc = mOAuthLoginInstance.getLastErrorDesc(getApplicationContext());
                    Toast.makeText(getApplicationContext(), "errorCode:" + errorCode + ", errorDesc:" + errorDesc, Toast.LENGTH_SHORT).show();
                }
            };
        };

        mOAuthLoginButton.setOAuthLoginHandler(mOAuthLoginHandler);

        logout.setOnClickListener(new View.OnClickListener() {
            @Override
            public void onClick(View v) {
                Toast.makeText(getApplicationContext(),"로그아웃 되었습니다.",Toast.LENGTH_SHORT).show();
                mOAuthLoginInstance.logout(getApplicationContext());
            }
        });
private void NaverUserInfo(String msg){
JSONParser jsonParser = new JSONParser();
try {
JSONObject jsonObject = (JSONObject) jsonParser.parse(msg);
String resultcode = jsonObject.get("resultcode").toString();
Log.d("resultcode 확인 ",resultcode);
String message = jsonObject.get("message").toString();
Log.d("message 확인 ",message);
if(resultcode.equals("00")){
if(message.equals("success")){
JSONObject naverJson = (JSONObject) jsonObject.get("response");
String id = naverJson.get("id").toString();
String nickName = naverJson.get("nickname").toString();
String profileImage = naverJson.get("profile_image").toString();
String email = naverJson.get("email").toString();
String name = naverJson.get("name").toString();
Log.d("id 확인 ",id);
Log.d("nickName 확인 ",nickName);
Log.d("profileImage 확인 ",profileImage);
Log.d("email 확인 ",email);
Log.d("name 확인 ",name);
}
}
else{
//Toast.makeText(getApplicationContext(),"로그인 오류가 발생했습니다.",Toast.LENGTH_SHORT).show();
}
}
catch (ParseException e) {
e.printStackTrace();
}
}
private static String get(String apiUrl, Map<String, String> requestHeaders){
HttpURLConnection con = connect(apiUrl);
try {
con.setRequestMethod("GET");
for(Map.Entry<String, String> header :requestHeaders.entrySet()) {
con.setRequestProperty(header.getKey(), header.getValue());
}
int responseCode = con.getResponseCode();
if (responseCode == HttpURLConnection.HTTP_OK) { // 정상 호출
return readBody(con.getInputStream());
} else { // 에러 발생
return readBody(con.getErrorStream());
}
} catch (IOException e) {
throw new RuntimeException("API 요청과 응답 실패", e);
} finally {
con.disconnect();
}
}
private static HttpURLConnection connect(String apiUrl){
try {
java.net.URL url = new URL(apiUrl);
return (HttpURLConnection)url.openConnection();
} catch (MalformedURLException e) {
throw new RuntimeException("API URL이 잘못되었습니다. : " + apiUrl, e);
} catch (IOException e) {
throw new RuntimeException("연결이 실패했습니다. : " + apiUrl, e);
}
}
private static String readBody(InputStream body){
InputStreamReader streamReader = new InputStreamReader(body);
try (BufferedReader lineReader = new BufferedReader(streamReader)) {
StringBuilder responseBody = new StringBuilder();
String line;
while ((line = lineReader.readLine()) != null) {
responseBody.append(line);
}
return responseBody.toString();
} catch (IOException e) {
throw new RuntimeException("API 응답을 읽는데 실패했습니다.", e);
}
}네트워크 통신은 메인스레드에서 돌리면 에러가 발생해서 다른 스레드에서 작동 시켰습니다.
api로 얻은 accessToken토큰으로 유저의 정보를 얻어올수있습니다.
여기서 사용한 제이슨 라이브러리도 같이 첨부해드리겠습니다.!!
jar 라이브러리 안드로이드에 적용시키기
이곳에 .jar파일을 드래그로 넣어주세요. 경로를 아까 넣어두신 경로 찾아가서 잡아주시면 끝입니다!
onedaycodeing.tistory.com
'Android' 카테고리의 다른 글
| 안드로이드 raw폴더 생성하기. (0) | 2021.01.04 |
|---|---|
| 안드로이드 ListView(리스트뷰) (Custom)커스텀 해보기. (0) | 2020.12.16 |
| 안드로이드 카카오톡 로그인 연동하기 (0) | 2020.12.09 |
| 안드로이드 retrofit2(레트로핏2)를 이용한 통신예제 (2) (0) | 2020.12.08 |
| 안드로이드 retrofit2(레트로핏2)를 이용한 통신예제 (1) (0) | 2020.12.08 |


댓글