728x90
반응형
안녕하세요
오늘은 ListView를 커스텀 해볼려고 합니다.
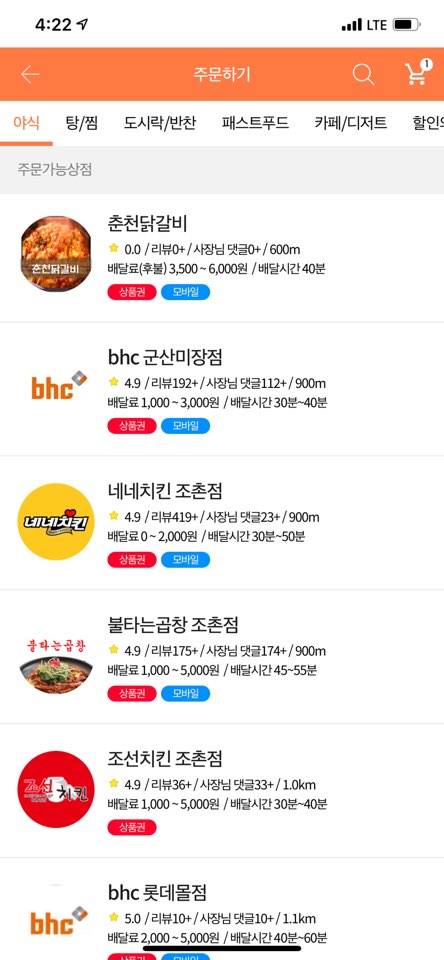
오늘 커스텀 해볼 참고 리스트뷰는

배달앱에 있는 이런 디자인의 리스트뷰 입니다.
그림은 그냥 안드로이드 자체에서 가지고있는걸로 했습니다.
우선
custom_listview.xml
을 하나 생성해보겠습니다.
<?xml version="1.0" encoding="utf-8"?>
<LinearLayout
    xmlns:android="http://schemas.android.com/apk/res/android"
    android:layout_width="match_parent"
    android:layout_height="match_parent"
    android:orientation="horizontal">

    <ImageView
        android:id="@+id/mainImage"
        android:layout_width="70dp"
        android:layout_height="70dp"
        android:src="@drawable/ic_launcher_background">
    </ImageView>

    <LinearLayout
        android:layout_width="wrap_content"
        android:layout_height="wrap_content"
        android:orientation="vertical">

        <TextView
            android:id="@+id/title"
            android:layout_width="wrap_content"
            android:layout_height="wrap_content"
            android:padding="3dp"
            android:textColor="#000000"
            android:textSize="15dp"
            android:text="60계치">
        </TextView>

        <LinearLayout
            android:layout_width="wrap_content"
            android:layout_height="wrap_content"
            android:orientation="horizontal">

            <ImageView
                android:id="@+id/star"
                android:layout_width="15dp"
                android:layout_height="15dp"
                android:padding="3dp"
                android:src="@drawable/ic_launcher_background">
            </ImageView>

            <TextView
                android:id="@+id/body_1"
                android:layout_width="wrap_content"
                android:layout_height="wrap_content"
                android:textSize="10dp"
                android:text=" / 리뷰1+ / 사장님댓글1+ / 100m"
                android:textColor="#000000">
            </TextView>
        </LinearLayout>

        <LinearLayout
            android:layout_width="wrap_content"
            android:layout_height="wrap_content"
            android:orientation="horizontal">

            <TextView
                android:id="@+id/body_2"
                android:layout_width="wrap_content"
                android:layout_height="wrap_content"
                android:padding="3dp"
                android:textSize="10dp"
                android:text="배달료 0원 / 배달시간 45~60"
                android:textColor="#000000">
            </TextView>
        </LinearLayout>

        <LinearLayout
            android:layout_width="wrap_content"
            android:layout_height="wrap_content"
            android:orientation="horizontal">

            <ImageView
                android:id="@+id/opt1"
                android:layout_width="50dp"
                android:layout_height="15dp"
                android:padding="3dp"
                android:src="@drawable/ic_launcher_background">
            </ImageView>

            <ImageView
                android:id="@+id/opt2"
                android:layout_width="50dp"
                android:layout_height="15dp"
                android:padding="3dp"
                android:src="@drawable/ic_launcher_background">
            </ImageView>

            <ImageView
                android:id="@+id/opt3"
                android:layout_width="50dp"
                android:layout_height="15dp"
                android:padding="3dp"
                android:src="@drawable/ic_launcher_background">
            </ImageView>

            <ImageView
                android:id="@+id/opt4"
                android:layout_width="50dp"
                android:layout_height="15dp"
                android:padding="3dp"
                android:src="@drawable/ic_launcher_background">
            </ImageView>
        </LinearLayout>
    </LinearLayout>
</LinearLayout>
대충 이러한 이미지 입니다.

그다음에 CustomListView.java 클래스를 하나 만들게요.
import android.content.Context;
import android.view.LayoutInflater;
import android.view.View;
import android.view.ViewGroup;
import android.widget.BaseAdapter;
import android.widget.ImageView;
import android.widget.TextView;
import java.util.ArrayList;

public class CustomListView extends BaseAdapter
{
    LayoutInflater layoutInflater = null;
    private ArrayList<ListData> listViewData = null;
    private int count = 0;

    public CustomListView(ArrayList<ListData> listData)
    {
        listViewData = listData;
        count = listViewData.size();
    }

    @Override
    public int getCount()
    {
        return count;
    }

    @Override
    public Object getItem(int position)
    {
        return null;
    }

    @Override
    public long getItemId(int position)
    {
        return 0;
    }

    @Override
    public View getView(int position, View convertView, ViewGroup parent)
    {
        if (convertView == null)
        {
            final Context context = parent.getContext();
            if (layoutInflater == null)
            {
                layoutInflater = (LayoutInflater) context.getSystemService(Context.LAYOUT_INFLATER_SERVICE);
            }
            convertView = layoutInflater.inflate(R.layout.custom_listview, parent, false);
        }

        ImageView mainImage = convertView.findViewById(R.id.mainImage);

        TextView title = convertView.findViewById(R.id.title);
        TextView body_1 = convertView.findViewById(R.id.body_1);
        TextView body_2 = convertView.findViewById(R.id.body_2);

        mainImage.setImageResource(listViewData.get(position).mainImage);
        title.setText(listViewData.get(position).title);
        body_1.setText(listViewData.get(position).body_1);
        body_2.setText(listViewData.get(position).body_2);

        return convertView;
    }
}
BaseAdapter를 상속받은 클래스를 작성했습니다.
이 어댑터에서 리스트 내용을 수정하여 전달합니다.
결정적으로 생성자에서 값들을 받아서 getView에서 내용이 수정됩니다.
ListData에서 에러 나서 이상하다고 느끼시는 분들 많을거에요..
ListData 클래스 만들어주겠습니다.
public class ListData {
    public int mainImage = 0;
    public int opt_1 = 0;
    public int opt_2 = 0;
    public int opt_3 = 0;
    public int opt_4 = 0;
    public int star = 0;

    public String title = "";
    public String body_1 = "";
    public String body_2 = "";
}
이게 커스텀한 뷰의 데이터 모델 클래스 입니다.
이미지뷰에 넣을 값을 int로 선언한 이유는 저희가 이미지를 변경할때 쓰는 값이 결국은 int형 값이기 때문이에요.
이제 메인 보겠습니다.
<?xml version="1.0" encoding="utf-8"?>
<androidx.constraintlayout.widget.ConstraintLayout
    xmlns:android="http://schemas.android.com/apk/res/android"
    xmlns:app="http://schemas.android.com/apk/res-auto"
    xmlns:tools="http://schemas.android.com/tools"
    android:layout_width="match_parent"
    android:layout_height="match_parent"
    tools:context=".MainActivity">

    <ListView
        android:layout_width="match_parent"
        android:layout_height="match_parent"
        android:id="@+id/listview">
    </ListView>

</androidx.constraintlayout.widget.ConstraintLayout>
메인에서는 그냥 리스트뷰만 하나 만들어줬습니다.
import androidx.appcompat.app.AppCompatActivity;
import android.os.Bundle;
import android.util.Log;
import android.view.View;
import android.widget.AdapterView;
import android.widget.ListAdapter;
import android.widget.ListView;
import java.util.ArrayList;

public class MainActivity extends AppCompatActivity {

    ListView listView;

    @Override
    protected void onCreate(Bundle savedInstanceState) {
        super.onCreate(savedInstanceState);
        setContentView(R.layout.activity_main);

        listView = findViewById(R.id.listview);

        ArrayList<ListData> listViewData = new ArrayList<>();
        for (int i=0; i<30; ++i)
        {
            ListData listData = new ListData();

            listData.mainImage = R.drawable.ic_launcher_foreground;
            listData.star = R.drawable.ic_launcher_foreground;

            listData.title = " 테스트"+i;
            listData.body_1 = " / 리뷰51+ / 사장님댓글13+ / 410m";
            listData.body_2 = "배달료 3000원 / 배달시간 30~35";

            listViewData.add(listData);
        }


        ListAdapter oAdapter = new CustomListView(listViewData);
        listView.setAdapter(oAdapter);

        listView.setOnItemClickListener(new AdapterView.OnItemClickListener() {
            @Override
            public void onItemClick(AdapterView<?> parent, View view, int position, long id) {
                String clickName = listViewData.get(position).title;
                Log.d("확인","name : "+clickName);
            }
        });
    }
}
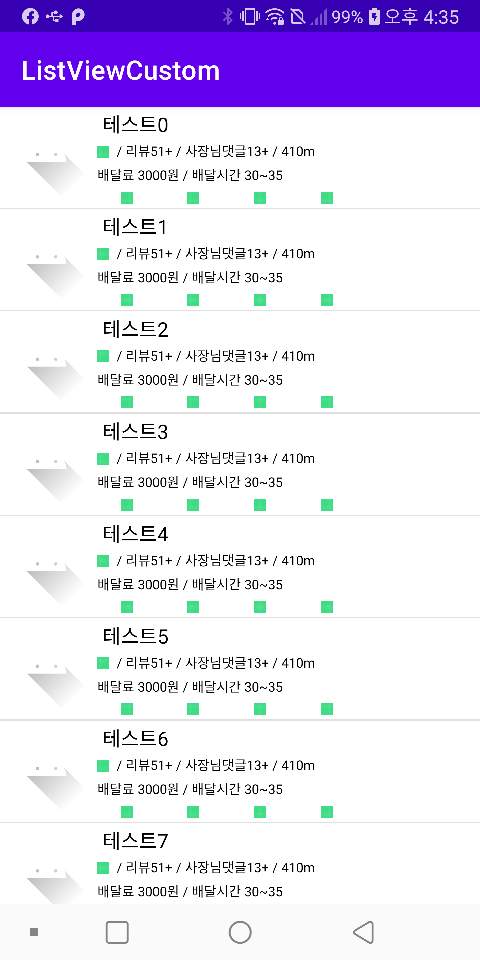
메인 소스입니다.
30개의 데이터를 넣어줬습니다.
귀찮아서 이름 끝에만 바꿨습니다...
이렇게 끝입니다..!!

해당 이미지는 자유롭게 디자인하신 이미지로 변경하시면 될것같습니다.
728x90
반응형
'Android' 카테고리의 다른 글
| 안드로이드 GIF 이미지를 ImageView(이미지뷰)에 띄우기 (0) | 2021.01.04 |
|---|---|
| 안드로이드 raw폴더 생성하기. (0) | 2021.01.04 |
| 안드로이드 네이버 로그인 예제 (0) | 2020.12.11 |
| 안드로이드 카카오톡 로그인 연동하기 (0) | 2020.12.09 |
| 안드로이드 retrofit2(레트로핏2)를 이용한 통신예제 (2) (0) | 2020.12.08 |


댓글